Simple
ways to optimise your videoconferencing
Adrian’s mobile phone number is +44 (0)774 703 5984
Studio phone is +44 (0)1223 766824
Camera
Displaying the VC
Audio
Room layout
Technical run-through
MCU bridge
If students' work is to be seen clearly by other participants, it needs
to be displayed clearly. The best way to achieve this at the moment is
to use PowerPoint.
Using PowerPoint is a useful skill for students. It is also a simple method
of connecting a PC/Mac via a single cable to the VGA input of the codec.
Students can incorporate any "stills" using JPEG or TIFF and
these can be embedded directly in the PowerPoint presentation. However,
students should be discouraged using animated PowerPoint as it takes time
for the VC image to settle down, and too much unnecessary movement reduces
the clarity of the image seen by other participants.
If the students wish to use other methods of delivery, for instance,
video footage, please contact Adrian to discuss the limitations well before
the videoconference (0774 703 5984). If you are a City Learning Centre
or a school hosting other participants, it will save time to have pre-installed
a version of PowerPoint
97 viewer (available as a free download). This should be a "work
around" for any version problems attached to Win 98/NT4 stored media
brought by other schools for presentation.
Other ways of presenting students' material
Follow
this link for suggestions on how to make presentations clearly visible
to all participants of a videoconference.
If you have a document camera attached to the codec it is possible to
display 3D objects or A4 sheets but make sure that they are printed in
landscape only.
Return to top
Inputs to the Codec
The input buttons change the various inputs of the codec. These usually
include:
- main PTZ camera
- PC/Mac input (for PowerPoint presentations and electronic whiteboards)
- other
Camera
- avoid the idea that you are the “Match of the Day” cameraman
following the live action!
- in videoconferencing it is far better to strictly limit the amount
of camera movement
- a golden rule is … DON’T DO IT!
- most systems have preset buttons, so use these instead and let the
equipment do the work for you!
Preset buttons:
- used to position the PTZ (Pan/Tilt/Zoom) camera in a pre-determined
position
- it is usual to only have a single PTZ camera which can be used to
broadcast the live action
- so often difficult to determine what is being broadcast to the other
participants of the conference ie. the remote audience
The solution to this is to use the camera presets which can be pre-programmed
into the conferencing system prior to the start of the conference.
A good way to set the presets is:
Camera preset 1 : A group shot of all those participating
Although this is usually just a general impression of the students,
it is an important shot. It may lack fine detail, but it gives the general
impression of those assembled in the room to others at the other remote
site(s). This should be the main shot used during the videoconference.
Camera preset 2 : A shot of the students actually presenting
Mark an X on the floor with tape, so that the students know where to
stand.
Camera preset 3: A shot of the coordinator
If the coordinator needs to explain something to the other participants,
it will be much more effective if they can be seen. Mark an X on the floor
with tape, so that s/he knows where to stand.
Return to top
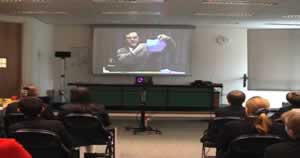
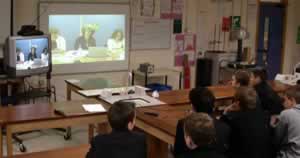 Displaying
the videoconference Displaying
the videoconference
Give some thought to how best present the video and audio signals from
the broadcast. Ensure that any room lights are switched "on"
otherwise your students' images will be in deep shadow.
A standard 25" TV screen is not large enough for more that 10 seated
for an hour. If you decide to use a data projector, consider running this
in parallel with a TV unit for the received audio, as data projector audio
circuits are not usually powerful enough and the students will not be
able to hear clearly.
If you have an interactive whiteboard it is worth displaying the broadcast
video images there but check the positioning to avoid any "reflective
sheen" for those seated.
It is worth remembering to position the codec away from the lens of a
data projector (as this could easily burn out the CCD circuits of the
camera/codec) and also it is good practice to avoid crossing the beam
of the camera (this can result in diffusing or "Blowing Out"
of the image transmitted).
Return to top
Audio
Probably the single most essential ingredient of a videoconferencing
session is good quality audio. However
- it is often difficult to balance the outgoing audio signal with the
incoming audio signal
- this can lead to echoed voices returning through the system
- so once set make a note of the settings and avoid altering the audio
levels during the conference.
A tip is to switch “off” the AGC (automatic gain control)
and switch “on” the echo cancellation circuits.
No matter how high the quality of the microphone, it is essential to
position the microphone as close to the students speaking as possible
(without distortion). If students are not close to the microphone either
it should be passed to them, or they should move close to it. Answers
to questions from the back of the room will not be heard.
Return to top
Room layout
This may need to be adjusted so that students can have access to a microphone.
If you have microphones on tables, make sure that if a student moves an
object around, the audio at the remote site doesn’t pick this up,
or at least that students know not to talk at the same time. Also:
- Try to control any noise in the surrounding areas eg. corridors,
doors slamming, noisy builders.
- Of course, this may not always be possible, so at least remember to
close the windows and keep the mute on unless someone wishes to be heard
from your end. This will help to eradicate outside noise and will also
reduce the reverberation in the room and generally improve the audio
and video quality transmitted from your site.
- Always use fluorescent lights - the camera/codecs are designed to
work under these and draw any blinds or curtains in the room. Full sun
in a bright room puts everyone in deep shadow.
Return to top
Technical run-through
These will be held in the hour before each videoconference starts. This
is an opportunity for those handling the technical aspects of a conference
to check the connection is good, to balance the audio levels, and to test
any other AVA being used. It is not an opportunity for students to rehearse
their presentations.
Return to top
Using an MCU bridge
If you are using ISDN, the numbers issued to you will give access to
the Multipoint Control Unit based in Edinburgh (Ukerna). All callers dial
in and are connected to each other via a bridging network. The ISDN issued
will be a single number, BONDed (bandwidth on demand), eg. 02085879349,
and will be emailed in advance of the videoconference. Some equipment
(Polycom and Sony codecs) will automatically duplicate the digits for
the second ISDN number. You then need to just delete this number and then
press connect. The MCU bridge network will automatically configure the
number of lines required. Any problems, contact Adrian who will help you.
If you are using IP, the MCU will dial through to you at a given time
(usually an hour before the conference). Please make sure your equipment
is turned on well before then or you will miss your connection.
We also arrange a technical 'dial' test link on the day before a first videoconference
starting at exactly the same time as the next day. This is optional, but
many technical officers in the past have found it useful. This test session
usually lasts 10-15 minutes, and we recommend that you take advantage
of this, at least for the first Motivate videoconference in which your
site participates.
| 
